Getting Started
 |
After having installed the client on your machine, you can launch it from the desktop or Start Menu. If you don't have the application shortcuts anywhere (that is, if you haven't selected the corresponding options during installation), you can always run the application directly from the installation folder (it's "Program Files" on your system drive by default). |
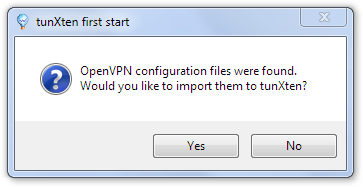
If you agree, all configuration files along with their corresponding security keys and certificates are copied to the tunXten working folder, which is located in
%APPDATA%\tunxten. When it's done copying, it displays a log window in the GUI showing the import status of each file:
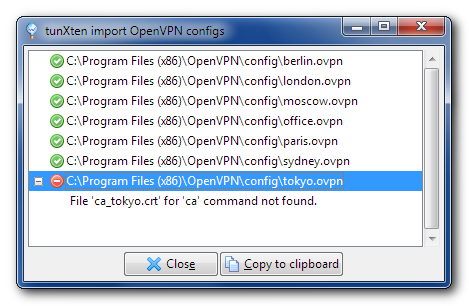
If any errors occur while importing configuration files, they are shown in the log. For example, on the screenshot above an error occurred while importing tokyo.ovpn config - its certificate cannot be found.
The original OpenVPN files are not affected in any way.
If no existing config files were found by the client, it will use a sample config from its installation directory, it won't connect you to any network but you can play with it to familiarize yourself with the look and feel of the GUI.
User interface elements
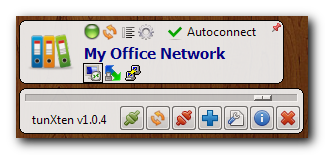
So, if everything went smooth and clear on the first run, you'll notice the application icon in your system notification area (system tray). You're not likely to miss it since it's gonna greet you: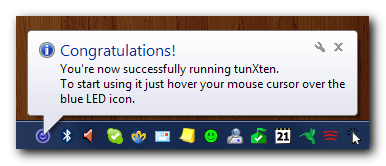
Now hover the mouse cursor over the icon and see what happens (if you didn't have any OpenVPN configs to import, only one sample config will be shown):

The small window on the bottom is the main one and directly above it are all OpenVPN config windows. tunXten has two display modes - extended, which is shown on the screenshot above (it is the default and recommended for a relatively small number of configs) and compact (you might like this mode better if you have a greater number of config files), it looks like this:
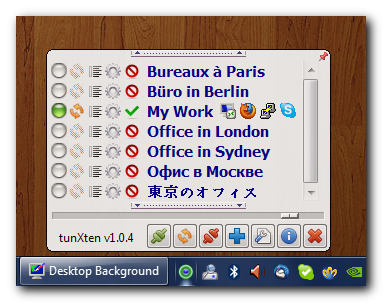
You can select the desired display mode in the settings.
The states of all activated connections are reflected by changing the notification area icon. The icon is a three-color LED capable of covering the range of all possible connection state combinations. When there are no active connections, all LEDs are off, like on the greeting screenshot above. Once there's a connection in progress, the yellow LED in the middle turns on. Green and red halos will show when there's at least one successful or failed connection, respectively.
Every interface element in the GUI has a helpful tooltip hint so that you don't forget what it actually does, but anyway, let's have a quick look - a picture is worth a thousand words:
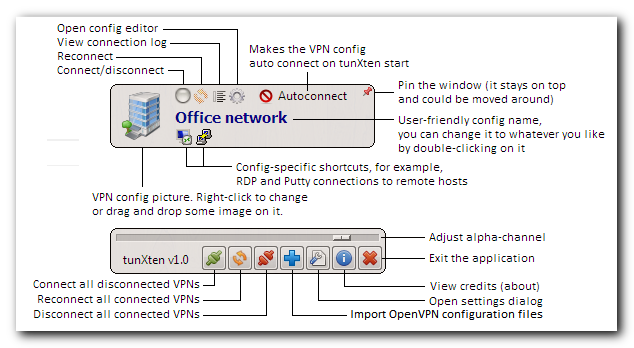
You can "pin" any window to the desktop using a small pin button in the upper right corner. If you do this, the window stays on top and can be moved around to any place you like (the most convenient way to do this is to grab and drag the window by its picture area). This can be useful if you have plenty of desktop real estate and want to have some of the most important configs readily available at any time.
Unpinning the window returns it to its "hiding place" behind the system notification area icon.
Every OpenVPN configuration has a context menu. To invoke the menu, just right-click on a configuration name, like this:
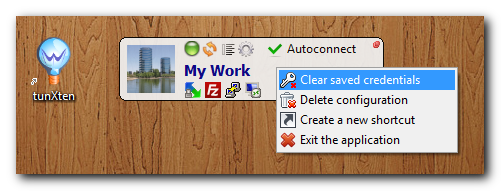
It allows you to:
- Delete previously saved credentials for the config (the menu item is disabled when there's nothing to clear as no login/password was saved).
- Delete the configuration. This option removes the OpenVPN configuration file along with any corresponding certificate/key files from your system and stops displaying the config. This menu item can also appear disabled, which means either the config file permissions prevent it from being deleted or this config is the only one left registered.
- Create a new shortcut for the configuration. Selecting this item will bring up the shortcut creation dialog (for more information refer to the Managing shortcuts section).
- Exit the application. This is most useful when using a floating config window, just like on the screenshot above, as it frees you from invoking the application window from the tray icon to reach the Exit button in the main toolbar.
Managing shortcuts
As you can see on the screenshot above, there are small icons just below the connection name. They are just ordinary windows shortcuts to miscellaneous applications that might serve special purpose when an OpenVPN connection is established. For example, it's handy to have some means for quick access to some specific hosts in the network you're connected to, like to your Windows desktop or some remote Linux server shell. So, how does one create these shortcuts for a connection? There are three ways to do it:- Right-click an empty area below the connection name.
- Right-click connection name and select "Create a new shortcut" item.
- If you already have your needed shortcuts somewhere then just pin the window and drag&drop them on it.
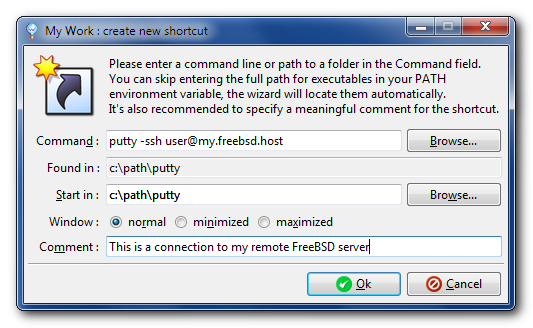
There's not much to say about this dialog, everything should be crystal clear, let's just note that the Comment field contents will be used as a hint tooltip for the shortcut, so it's advised to enter some helpful text here. After having specified every bit of information you want just press Ok and you are good to go.
If you want to edit a shortcut - simply right-click on it and you'll be presented with this dialog showing the shortcut's properties. And using Ctrl-right-click you'll get the standard Windows shortcut properties dialog.
Sometimes you'll want to delete some shortcuts - to do that, middle-click on the icon you want gone and confirm your action.
If you don't like the order the icons are displayed in, they can be easily rearranged by dragging them around in a connection window, lined up in the order you want.
But the most outstanding benefit of having connection-specific shortcuts is that you can set them to auto-launch after the secure tunnel is established - Ctrl+Click on a shortcut and it will be highlighted with a black border. You can turn the auto-start mode off by Ctrl+Clicking on the shortcut again. The black border will disappear. Thus, for example, you can have your RDP or SSH connections, represented by shortcuts, automatically initiated right after their associated OpenVPN connection is made.
Establishing connections
When you want to connect somewhere, just push the grey connect button in the corresponding VPN config window. The button also serves as a connection status indicator, it turns yellow when a connection is in progress, green when it is successfully established, and red if it fails with any fatal errors. If the VPN connection requires authentication credentials to be entered, you will be asked for them:
You can avoid the trouble of re-entering your username/password by checking the "Save credentials" checkbox. Your password is safely and securely stored using the industry standard strong AES encryption.
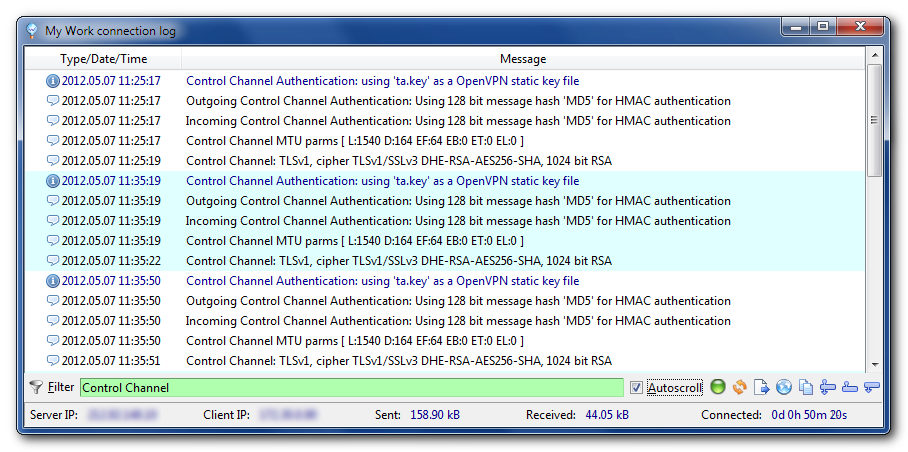
Much like the well known OpenVPN GUI application, tunXten shows the detailed log of what's happening during the connection process (you can turn this behavior off in settings):
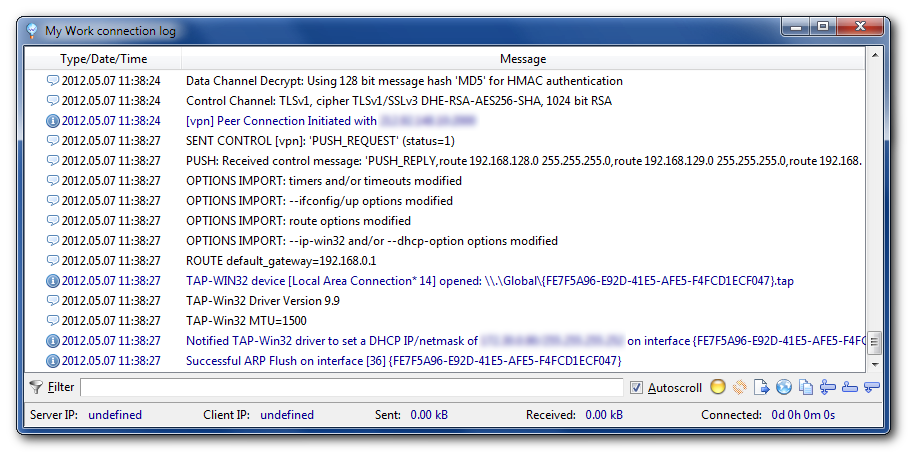
Log viewer has filtering abilities - just press Alt+F and enter a search string - after you've entered at least three characters the filter will be dynamically applied to the log contents showing you only the stuff you're interested in. You can also use the asterisk as a mask symbol:
To clear the search field just press Ctrl+X.
Log window highlights different VPN sessions so you can visually distinguish them in the log, it can be spotted on the screenshot above - there's a filter applied and it can be clearly seen there are several sessions present in the log (they have white and cyan backgrounds).
Let's see what the log viewer can do beside filtering:
 |
Alt+A | When checked, it makes the log list automatically scroll to the bottom so you always see the latest events even as they happen. |
 |
Ctrl+O/Ctrl+R | These buttons are just clones of the same buttons you see in every config window. They're here to let you control the VPN connection without having to bring forth the corresponding config window. |
 |
Ctrl+S | Exports everything in the log to a simple text file of your choice. |
 |
Ctrl+B | You can open the log in your default browser, retaining session coloring and item icons. |
 |
Ctrl+C | Copies current selection text to the clipboard. Multiselect capability is supported - you can use standard hotkeys (Ctrl+A, Ctrl+LeftClick, Shift+LeftClick) to select multiple entries of you choice. |
 |
Ctrl+L | Selects all entries that belong to the same session as the item currently selected. |
 |
Ctrl+PgUp/Ctrl+PgDn | Select the first item of the previous/next session if there is one, otherwise do nothing. |
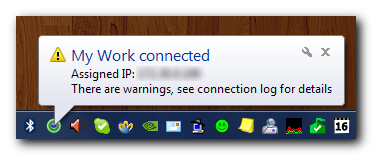
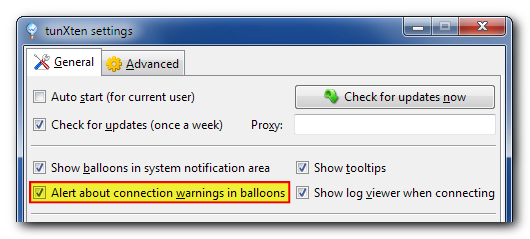
As you can see, tunXten by default notifies you about any warnings that might have appeared in the process of establishing a connection. However, our experience tells us that nearly every connection would have at least one or more insignificant warnings, so we gave you the option to tell the application not to display this message in the tray notification balloon:
Command line interface
It certainly makes sense to provide advanced features for power-users who often want to automate things through scripting. Most often this is done by leveraging command-line capabilities. Starting with version 1.0.5 tunXten has almost all its actions covered by command-line option counterparts: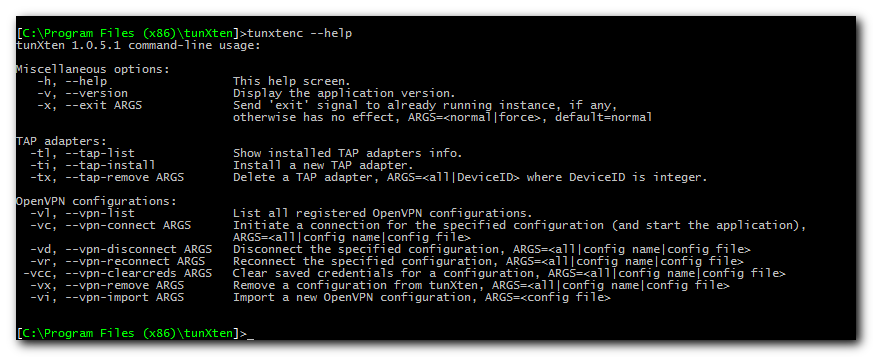
Mind that the actual executable used here is tunxtenc (ending with a 'c').
As you can see, all options are self-explanatory, but here are a few things to be aware of:
- --exit, --vpn-disconnect--, --vpn-reconnect commands only make sense when an instance is already running in which case the application just tells this instance what to do, waits for some feedback from it and then exits. If you specify these options and an instance is not running, an error message will be shown
- --vpn-connect command is the only one after which the application will continue running (provided there's no running instance already)
- you can specify multiple configs as input to all --vpn commands (except --vpn-import), like this, for example: tunxtenc --vpn-connect "My Remote Office" "My Secret Network"
- you can use file wildcards with the --vpn-import command, like this: tunxtenc --vpn-import c:\openvpn\configs\*.ovpn
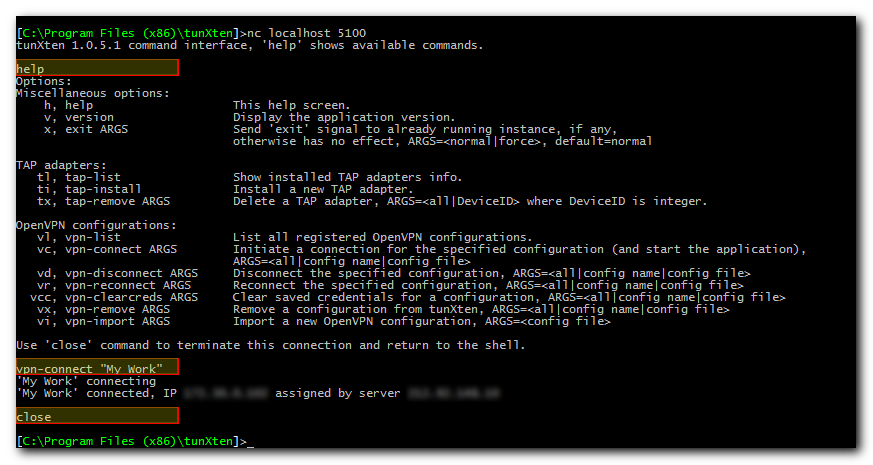
Now, is there any security concern about exposing all functions over the network? We don't think so, as only the loopback interface (with ip address 127.0.0.1) is involved, and it's not accepting incoming connections from any external networks. However, it is possible to make the program listen on an interface other than the loopback. If you're really into that, then just change the
port.listen directive in your %APPDATA%\tunxten\tunxten.ini file to include the interface you want to use,
like this:
port.listen=<ipaddress>:<port>You can use any valid IP address or port values here, but be warned that in this case you're opening the door for everyone aware about this setting. Currently no authentication is required and no secure encryption used in communicating with tunXten. We strongly suggest leaving this setting to its default values.
tunXten for sysadmins
One of the main goals for any system administrator is preparing the working environment for users. Mostly it is done by preconfiguring and deploying all the needed applications. So, can it be done with tunXten, and if yes, then how exactly? Starting with version 1.0.4, the installer supports a silent mode, making it possible to use this feature in automation scripts in deployment tasks. All that is needed is to supply the installer with the appropriate command-line switches:| /S | enter the silent mode, no GUI will be shown, no user interaction is required whatsoever. |
| /D=<full path to installation folder> | this switch can be used to override the default location, which is %PROGRAMFILES%\tunXten. |
| /INSTALLTAP=yes|no | the switch tells whether to install a TAP adapter driver or not (default behavior - the installer checks if there's a TAP driver already installed on the system, if yes - then only upgrade will be performed, if no TAP driver found - it will be installed). |
| /DESKTOP=yes|no | the switch controls whether to install a desktop shortcut to the binary or not (default behavior - install). |
| /STARTMENU=yes|no | tells whether to create a Start Menu group with the application shortcuts or not (default behavior - create). |
Program Files) along with the TAP driver and explicitly specifying that the Start Menu group won't be created, but the Desktop shortcut will:
tunXten-1.0.4-setup.exe /S /INSTALLTAP=yes /STARTMENU=no /DESKTOP=yes
There are two ways of troubleshooting the silent installation process:
- In silent mode the installer creates a log file
tunXten-silent-install.lognext to the installer executable, in case of failure it will contain helpful status lines. ERRORLEVELenvironment variable will be set to zero in case of successful installation or to the following values when the installation fails:
3 = installation was attempted by a restricted user, administrative privileges required.
4 = installation was auto cancelled when a running application instance was found.
5 = installation was auto cancelled when the service was found running and an attempt to stop it failed.
6 = installation was attempted under an unsupported OS (Windows 2000 or earlier).
license.dat right next to the executable and pasting the license key you've received in your order details.
When all is set and done, only one question remains - how can a sysadmin prepare any already existing OpenVPN configs to be readily available for users? That's quite easy, as tunXten picks up all VPN configuration files located in the
configs directory next to the application executable file. So, all you have to do is put all the necessary files in a separate subdirectory in the aforementioned configs directory, like on the screenshot:
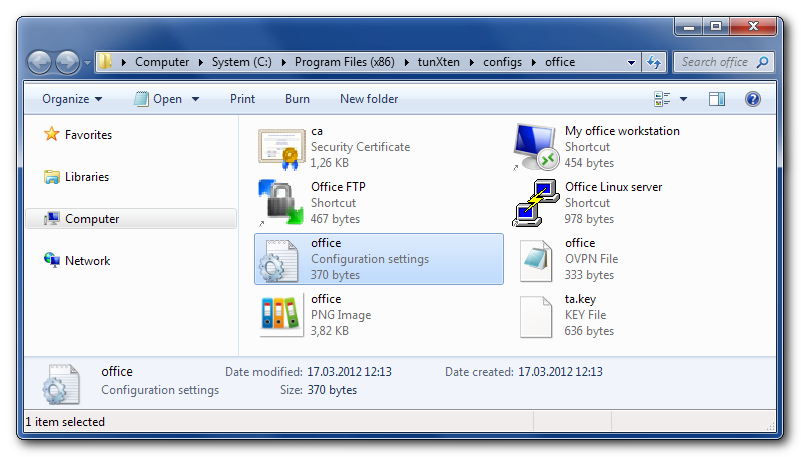
Next time tunXten starts it will load this config and show it in the GUI.
But the most interesting thing is that it's possible to predefine some application-specific settings for the VPN configuration, like its user-friendly name or the autostart option. Here's how to do this.
Create a file with the same name as the OpenVPN configuration file but with the
.ini extension. There's a certain catch to be aware about - the .ini file has to be in Unicode (in Notepad, for example, you can do this by selecting File->Save As in the menu and setting the Encoding combo-box at the bottom of the dialog to Unicode). Then specify the config settings like on the screenshot below, changing key values to the actual data you need:
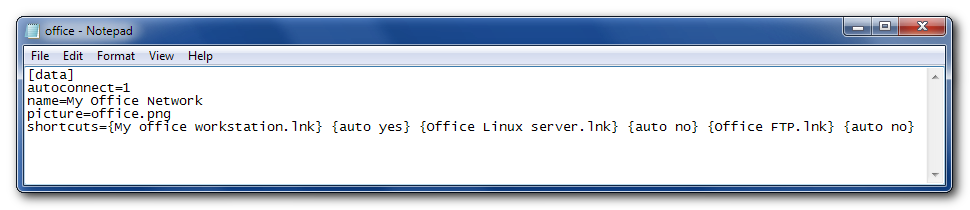
Here's the description of the most useful ini-file keys:
- name - defines a user-friendly name for the config.
- autostart - sets the config to auto launch on application start.
- shortcuts - a list of windows shell link shortcuts for the configuration in the format {file name.ext} {auto 1|0}
- savecred - with this key you can set the level of control over which credentials can be saved by a user. Takes values both|username|none.
configs directory in the installation folder.
Here's what the example config looks like when everything is done exactly as shown on the Notepad screenshot above:
Now, what if a user wants to change some parameters of a system-wide OpenVPN configuration? Well, if the user doesn't have administrative privileges on the system, they won't be able to change any files inside the
%PROGRAMFILES% directory due to
restrictive NTFS access rights. That might be preferable in certain scenarios when a system administrator explicitly wants
to prevent users from changing predefined settings for a configuration, but sometimes a sysadmin would want to deliver some
configuration to all users of the system, like described above, but making this particular set of files writable for any user,
so every one of them could adjust the settings to their liking. Is there any way to do that?
Enter template configs. They were introduced specifically to address this need. Any folder in
%PROGRAMFILES%\tunxten\configs
having the .template extension will be copied to upon the application's first start to the %APPDATA%\tunxten folder in the
user's profile. Here's an example:
- Suppose a sysadmin wants to deliver an OpenVPN configuration named
myoffice.ovpnto all users of the system with the bonus of letting users set their own preferences (like autostart, custom name, etc) regardless of the predefined settings - Sysadmin puts all the files (
myoffice.ovpn, certificates, corresponding.inifile with settings) in the%PROGRAMFILES%\tunxten\configs\myoffice.templatefolder - When the user johndoe logs in and launches tunXten, the application sees there's a template config and copies the entire folder to the user's profile to
%APPDATA%\tunXten\myofficefolder (stripping the.template. extension). Now the user has the config and can do whatever he wants with it - Next time the user launches the application, it won't copy the template config as it's already there (but note that if the user deletes the configuration from his profile, tunXten will copy it from the template folder again next time it starts)
.initial suffix to a parameter
name. For example, consider the following scenario:
- A sysdamin wants to deploy a predefined configuration to all users of the system, and he doesn't want them to be able to change any parameters he had set up
- But at the same time it's desirable to show the config's window to every user upon the first start and allow them to discard the pinned state of the window so it wouldn't annoy them every time they start the application
- So the sysadmin adds the following line to the config's .ini file:
window.initial=<width>x<height>+<x>+<y>
- Any user launching the application for the first time will see the window at the specified coordinates but will be able to unpin the window from the desktop or just move it to another place of their liking and this change will be remembered for each user individually.